Actor Factories & Actor Factory Ex's are
generally used to spawn AI-controlled entities in the level.
However, they can also spawn other items.
The only significant differences between and Actor Factory and
an Actor Factory Ex that I've found is:
• Actor Factories only provide control over one spawned
entity. If more than one entity is spawned, multiple references
don't matter - whatever action is further assigned to any reference
will only occur to one of the spawned entities, even if hooked
up to a difference object variable. Therefore, these seem to
only be good for spawning 1 entity.
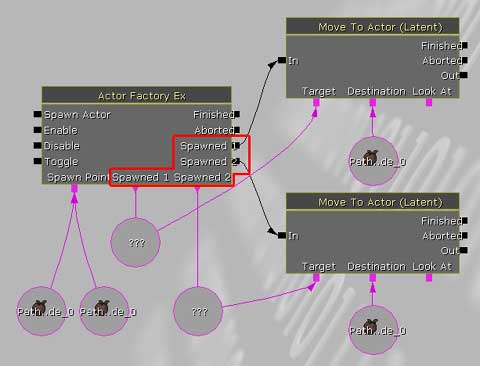
• Actor Factory Exes provide individual control over each
spawned reference/object variable. Therefore they are used for
controlling multiple entities separately.
• Spawn Count outlets: which could be hooked up to a variable
in order to vary spawn counts.
• Spawned/Spawned #: which can be used to provide greater
control over a specific reference.
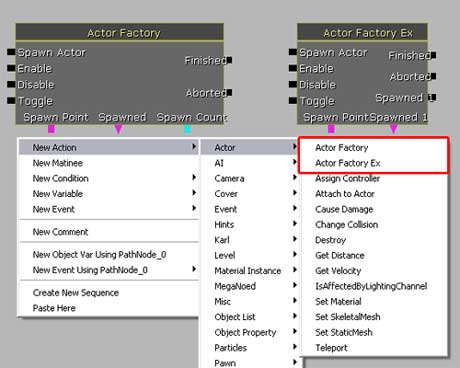
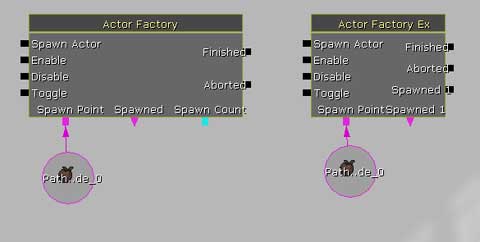
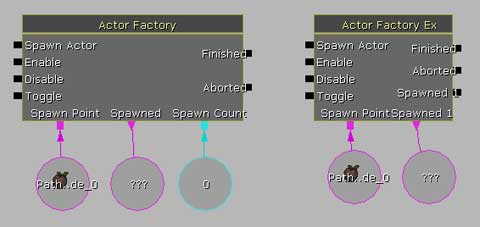
These shots are of an Actor Factory and Actor Factory EX each with a spawn count of 2 applied through its properties.
Let's go over the ins and outs that are common to each one:
• Spawn Actor: Yes, exactly. This is where the signal
will enter the factory.
• Enable: The factory is enabled by default. However,
if it is disabled, this will enable its function again.
• Disable: Basically, this will turn it 'off'. Even if
a signal comes in, it will not function
• Toggle: I don't know, but my guess would be that it
'toggles' enable and disable whenever a signal hits. If someone
does know, I'd be happy to be told.
• Finished: When the factory has finished its work, the
signal will continue out through here.
• Aborted: Again, not quite sure what this represents.
Perhaps if the spawning was interrupted somehow?
• Spawned: These can be used instead of the 'Finished'
outlet on the Actor Factory Ex.
Now that we have one, what can we do with it? Let's add the
supporting variables. |
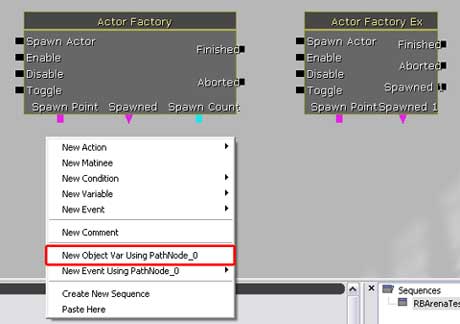
• Step 1: In the test map, select a pathnode, and then
bring up the context menu. You'll see a new addition to it:
'New Object Var Using PathNode_0'. This tells Kismet to create
a new Object Variable, and also assign PathNode_0 to that variable.
This is how you link objects in the physical map to the actions
in Kismet. We'll get to the 'New Event Using Pathnode_0' in
another tutorial.
• Step 2: Now, place it under the 'Spawn Point' outlet
of the Actor Factory by ctrl-clicking it, and moving it as you
would an actor in the physical map.
• Step 3: Connect it to the 'Spawn Point' by dragging
a line from the pink triangle under the 'Spawn Point' text on
the Actor Factory, and dropping it on the Pathnode's Object
Reference.
• Step 4: We need another one for the Actor Factory EX,
so we want to duplicate the Object Variable. Press 'Shift-D'
and then move the new Object Variable under the 'Spawn Point'
outlet of the Actor Factory Ex. Connect the ActorFactory Ex
to the Object Reference. Your Kismet should now look something
like this:
• Step 5: At this point, if we set some properties in
the Actor Factories, we'd be able to spawn something AT that
pathnode. But we may need to give that spawned item some commands
through Kismet later in its life. So we'll need to give the
spawned entity it's own Kismet Object Variable so that we can
reference it in Kismet.
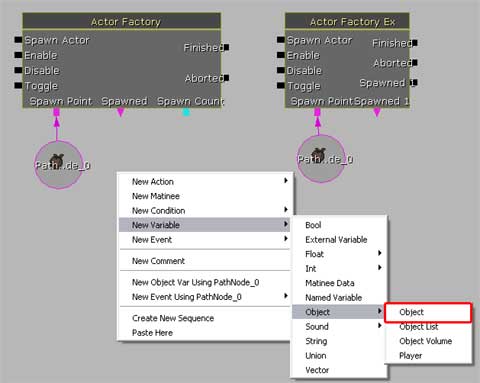
To do this, we'll create an 'empty' Object Variable, that will keep track of the spawned entity, when it blinks into existence, and link it to the Actor Factories.
So, using the context menu, go to New Variable -> Object -> Object, as seen below:
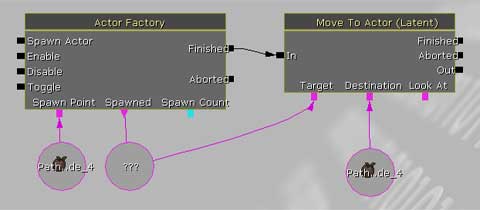
• Step 6: Once you have one, duplicate it, and then connect both to the 'Spawned' Outlets of each Actor Factory so that they look like this:
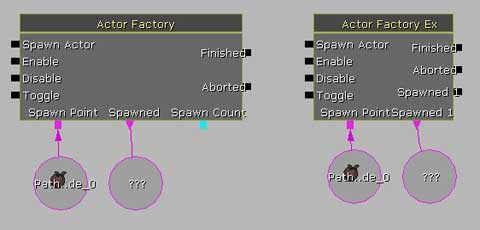
Let me pause at this point and reiterate one point: The Pathnode_0
object is the 'Where' of what the Actor Factory
is spawning. The empty '???' Object Variable is going represent
the 'What' is being spawned if we need to use
Kismet to perform other operations on it.
• Step 7: This step applies only to the Actor Factory.
As you can see, we still have an available 'Spawn Count' outlet
on the Actor Factory. Let's create a Integer like so:
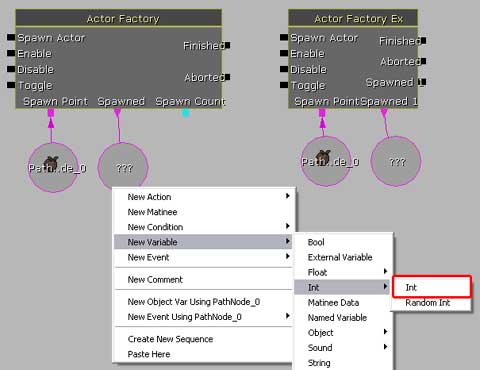
and then hook it up to the 'Spawn Count' of the Actor Factory:
And then change it's Value to '1' by entering it into its properties like so:
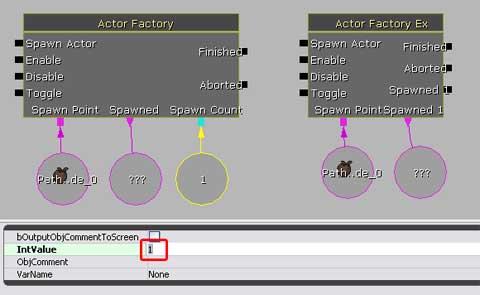
When assembled like this, it means the Actor Factory will spawn a Quantity of 1 at Pathnode_0 and its Kismet reference is contained in the '???' Object Variable.
Note: The 'Spawn Count' outlet is not exposed on the Actor Factory
Ex because it's assigned in its properties. There is also a
field in the Actor Factory to type in a fixed Spawn Count. However,
if an external variable is used, like in the example above,
the Spawn Count Outlet Value will override the Spawn Count assigned
in the Actor Factory's properties.
|
Properties:
Now, let's take a look at the properties within the Actor Factories:
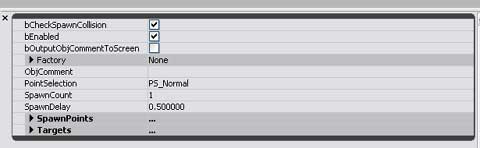
• bCheckSpawnCollision: Like it sounds, it checks to see
if anything will collide with the item being spawned.
• bEnabled: Is the Factory On or Off, by Default, when
the level starts?
• bOutputObjCommentToScreen: Print the object comment
on screen when the action is fired
• Factory: This is what the Factory is going to make is
determined. We'll come back to this.
• ObjComment: This comment will appear in text above the
factory in Kismet. I personally find it useful to enter a quick
comment about what I'm spawning.
• PointSelection: Normal, Random, or Reversed? I don't
know what this does.
• Spawn Count: How many will the factory make?
• Spawn Delay: After the signal enters the factory, how
long to wait to spawn the item?
• SpawnPoints: As more pathnodes (or whatever) are added
to the SpawnPoint Outlet, this list will populate with whatever
has been assigned as object variables.
• Target: As more items are spawned, this list will populate
with the references attached to the 'Spawned' outlet of the
Factory.
Now, let's turn our attention back to the Factory portion of
the Actor Factory. If the Factory bar is clicked, a small blue
down-pointing arrow will appear. Click it, and it will bring
up a menu of possible items to spawn. Like so:
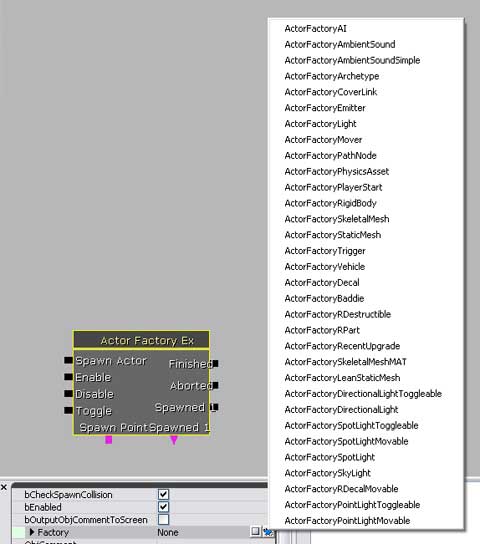
Also, if you click on the small grey box immediately to the
right of the blue triangle, that will clear the factory, and
allow you to start the factory from scratch.
There are so many options within each factory that you can choose
that going through each of them is beyond the scope of this
tutorial. In addition, they're fairly self-explanatory. So we
will end this one here.
|